
Quick StartDataMagicSyncsSync ExecutionsReportMagicCached ValuesMacro DefaultsAccessAgent ConsoleApi TokensAudit LogsBadgesBrandingCertificatesConnectionsConnection Role SecurityAgent Connections (In-House Systems)AutoTask ConnectionsCertify ConnectionsCherwell ConnectionsCisco ConnectionsCloudHealth ConnectionsConnectWise Manage ConnectionsDatabase ConnectionsIMAP ConnectionsJira ConnectionsGit / GitHub ConnectionsHubSpot ConnectionsLogicMonitor ConnectionsLogicMonitor DataMagic configurationMeraki ConnectionsMicrosoft Azure ConnectionsMicrosoft Dataverse ConnectionsMagic Suite ConnectionsSalesforce ConnectionsServiceNow ConnectionsSharePoint ConnectionsSFTP ConnectionsSMTP ConnectionsToggl ConnectionsWeb ConnectionsFeedbackNotificationsSubscriptionsUsers
Connecting to SharePoint
This page describes steps needed to connect ReportMagic to a Drive in Microsoft SharePoint:
- Registering the App with correct permissions
- Retrieving the DriveId
- Mounting a Folder in ReportMagic
Registering the App with Correct Permissions
1. Register an app in the Azure portal using the steps in this article. For example:
- Sign in to the Azure portal
- In the left-hand navigation pane, select the Microsoft Entra ID service, and then select App registrations then New registration:


2. In the Overview of the created App, note the Application (client) ID and the Directory (tenant) ID:


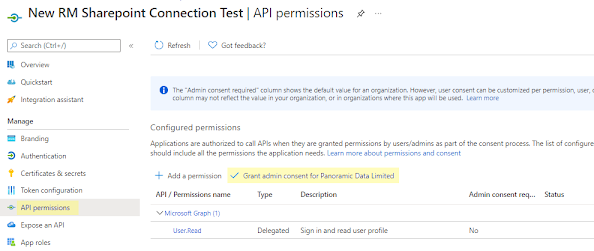
3. When the app has been successfully created, configure it to access the Graph API. Grant Files.ReadWrite.All and Sites.Read.All permissions to the application as shown below. You may need an Azure Administrator to do this. Microsoft guidance is available here.
- Select API permissions and then "Grant admin consent for xxxxxx". Ensure you confirm this when prompted.
- Select Microsoft Graph:

- Select Application Permissions:

- Under Files, select Files.ReadWrite.All and under Sites, select Sites.ReadWrite.All then click the Update Permissions button.
4. Select Grant admin consent for xxxxxx then confirm this when prompted.


5. Under Certificates & secrets, click to create a new client secret and ensure you save it, as you will not be able to see it again and it is required when creating a SharePoint connection in ReportMagic. For example:

Next retrieve the root DriveID.
Retrieving the DriveId
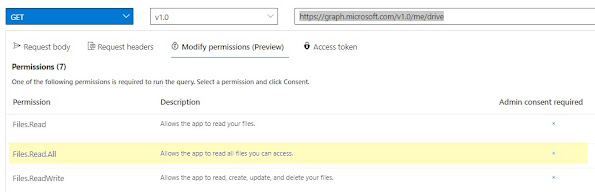
To retrieve the root DriveId:- Sign in to Graph Explorer
- In the SharePoint UI, pick any file/folder from the root of the Drive you want to mount.
Tip: Identify a unusually-named file and use the extension as well for better results. - In the Graph Explorer UI, set the target to https://graph.microsoft.com/v1.0/me/drive and then select Modify permissions (preview).
- Grant Graph Explorer permission to the "Files.Read.All".
- Open the Request body view:
- In Sample Queries on the left, find "Search" and then type "search driveitems".
- Click the search driveitems result to populate the Request body on the right hand side.
- The "queryString" in the Request body first loads with the default value "Contoso". Replace this by typing the exact name of the file or folder you identified into the request/query/queryString JSON element in the Request body and click Run query:

- From the search results, find and note the value/hitsContainers/hits/resource/parentReference/driveId string:


Continue with the remaining instructions.
Mounting a Folder in ReportMagic
To mount a SharePoint folder in the root Drive, create a new File Connection from ReportMagic:
- From the Admin menu, click Connections.
- Click Create.
- Enter a name - this is how your Drive will appear in the ReportMagic Files Explorer.
- Select the connection type of Microsoft SharePoint.
- Enter the URL of your company's SharePoint root, for example, https://panoramicdata.sharepoint.com
- In the User name field, enter the Application ID.
- In the Password field, enter the value of the Secret you generated earlier. Passwords are stored encrypted in our database, and cannot be accessed by any other users
- Optionally check the Read Only box. This ensures that under no circumstances can any user write to, or delete from, the entire SharePoint location
- In the Configuration field, as JSON, enter at least TenantId and DriveId. DrivePath is optional and is used for mounting a subfolder within the Drive:
{
"TenantId": "your Directory (tenant) ID",
"DriveId": "your DriveId you just got from Graph Explorer",
"DrivePath" : "/path/to/subdrive"
}
"TenantId": "your Directory (tenant) ID",
"DriveId": "your DriveId you just got from Graph Explorer",
"DrivePath" : "/path/to/subdrive"
}
Now head to the Files menu and try it out! Note that the SharePoint search feature is very limited and this will be reflected in the ReportMagic API.


